Using surface plasmon resonance to get high quality binding kinetics is definitely rewarding, but the biggest challenge is often finding the right experimental conditions to get optimal binding kinetics. One of the most important steps to consider is the regeneration step, or more specifically, the regeneration buffer. The regeneration buffer is used to disrupt or reverse the binding between the ligand and analyte, and is often an essential step to getting good kinetics. This can be a tricky task, so we hope that these tips will help you rock your regen! We’ll be going over the principles of regeneration, when to use it, how to optimize it according to your ligand and analyte, and what the resulting benefits are if you execute the steps correctly.
When do I need a regeneration buffer?
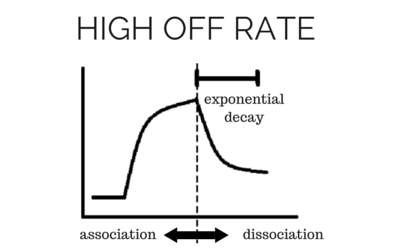
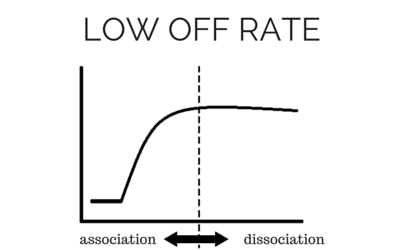
To determine accurate binding constants (kon, koff and KD) for an interaction using SPR, you need 3-5 binding curves of analyte at different concentrations. Whether you need a regeneration step or not depends on the off rate of the ligand-analyte complex. If the off rate is high, the analyte will dissociate from the surface in a short amount of time (ex – 5 minutes), so a regeneration step is not needed in order to have multiple analyte injections. If the off rate is low, the analyte will take a very long time to dissociate (hours), so in order to get multiple analyte injections in a reasonable amount of time, you need to regenerate.
By being able to regenerate the ligand-analyte complex, researchers can reuse the same sensor chip many times, making SPR a cost-effective technique.
What types of regeneration buffers are there?
We have summarized the most common regeneration buffers in the table below. The optimal buffer to use is specific to the type of molecules being studied and their affinity.
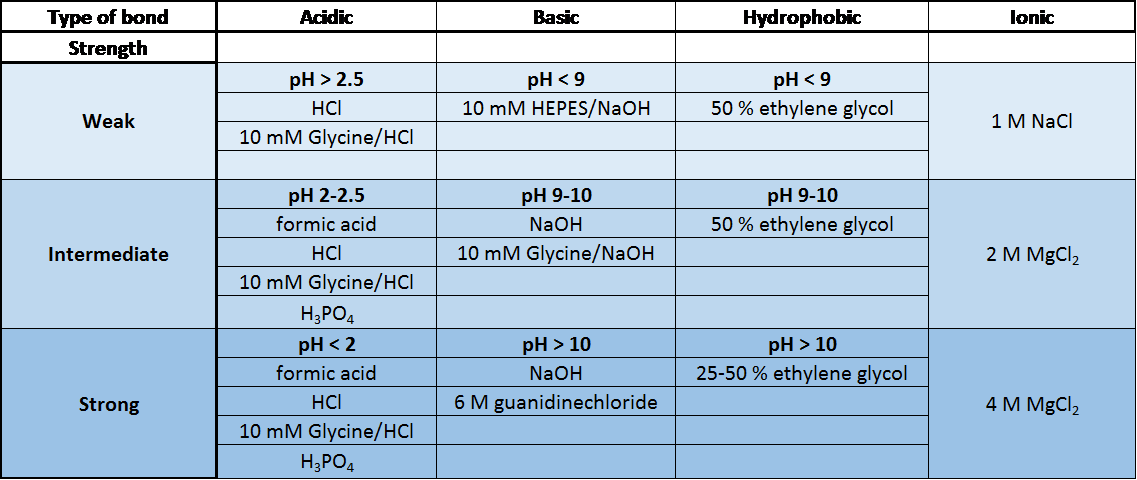
Common Regeneration Buffers used in SPR [1]
How do I choose the right regeneration conditions?
The most effective regeneration buffer to use is specific to the types of molecules being studied and their affinity, and must be optimized for each case. It is critical to choose a regeneration buffer that is harsh enough to remove all of the analyte, but mild enough that it does not severely damage the functionality of the ligand. The ligand activity should be preserved even after multiple regeneration cycles, otherwise the analyte response will decrease significantly during future injections. Below we have shown examples of binding curves that show what happens when you use an optimal regeneration buffer versus one that is too harsh or too mild.
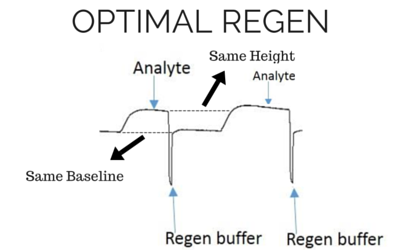
Baseline and height should be the same for the next analyte injection with the same concentration.
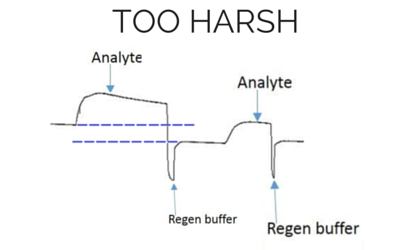
Baseline and height is lower for the next analyte injection with the same concentration.
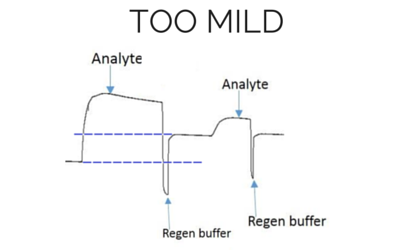
Baseline and height is higher for the next analyte injection with the same concentration.
Sometimes, depending on your experiment, multiple cycles of different solutions or a cocktail of different components are required to fully remove the analyte.
The opposite is also true. If the treatment is not harsh enough, you will not be able to remove all the analyte, decreasing the quality of the kinetics. Hence, regeneration scouting should start with the mildest conditions and progressively increase the intensity until the surface is completely regenerated. In order to verify the ligand integrity, you can repeatedly inject analyte and regeneration solutions, and monitor whether the ligand binding characteristics remain comparable throughout the injection cycles. An example of what an ideal regeneration curve should look like is shown below.
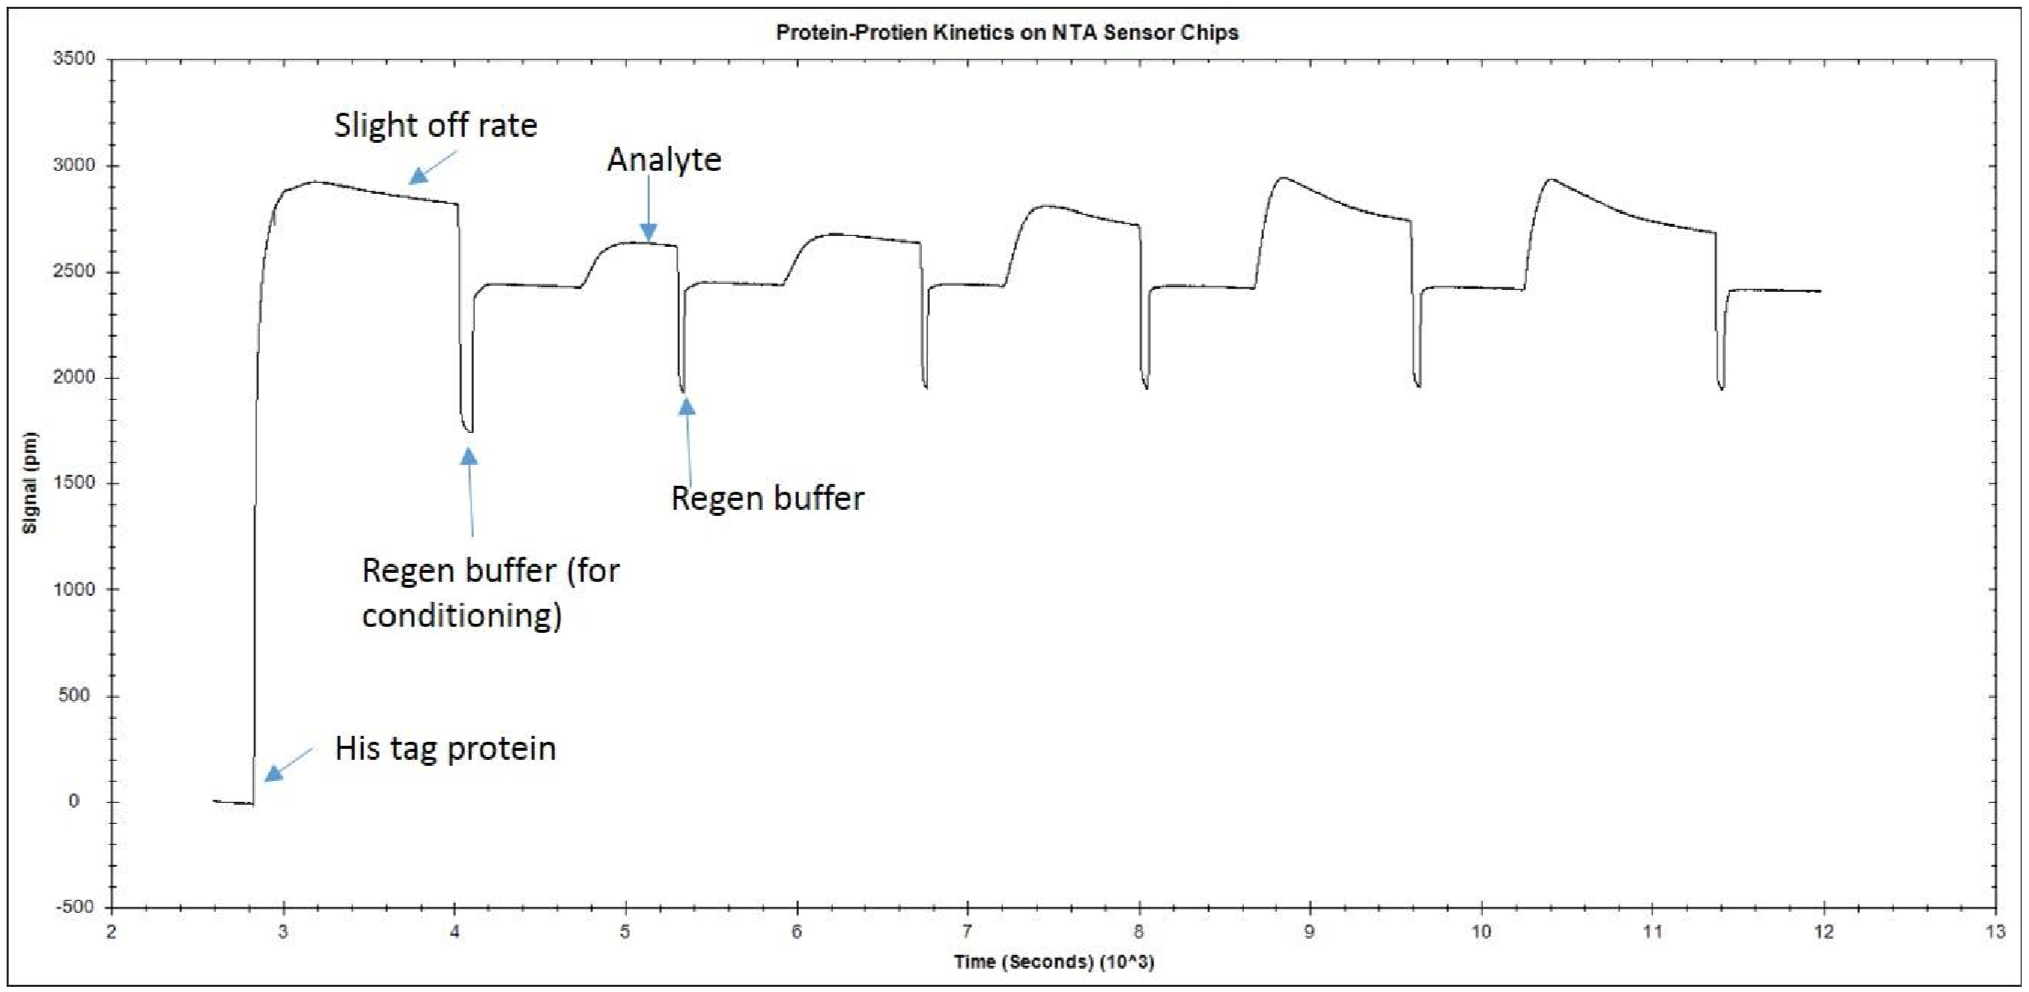
Example response graph with regeneration of surface between subsequent analyte injections.
As you can see in the example, the regeneration does not damage the ligand because the baseline stays relatively constant after each regeneration. If the conditions were too harsh, the baseline may decrease after each regeneration step, and the amount of analyte binding would also decrease. If the regeneration was too mild, the baseline would remain higher than its original level, as analyte would be left on the surface.
Below we have listed common regeneration conditions for different types of molecular interactions. This is a great starting point when you are unsure of the type of regeneration to use.
1. Acid 5-150 mM
- Proteins
- Antibodies
2. SDS 0.01 – 0.5%
- Peptides
- Proteins/Nucleic acids
3. NaoH 10 mM
- Nucleic acids/Nucleic acids
4. IPA:HCl 1:1
- Lipids
In order to reduce the effects of decreased ligand activity due to regeneration, you can fit your curves to a local Rmax
As a last note and reminder, it is good practice to condition the ligand surface prior to injecting analyte. You can do this by performing 1-3 injections of regeneration buffer. It can also be helpful to inject analyte at high concentrations and regenerate, repeating 1-3 times to condition the surface.
Ready to regenerate? Great! Allow our application scientists help you get the best results in no time.
[1] “Regeneration.” SPRPages Regeneration. http://www.sprpages.nl/kinetics/regeneration.